How to Set Up the Windows Remote Desktop Connection to Cornerstone
Overview
This guide explains how to set up the Remote Desktop Connection (RDP) to access Cornerstone on a Windows PC. It covers downloading the RDP connection file, saving your login credentials in Windows Credential Manager, configuring the Remote Desktop Connection, and advanced options including display settings, drive mapping, and document management via FTP or mapped drive.
Last Revised: 5/23/2025
Part 1: Download the RDP Connection File
- Open any web browser. Microsoft Edge, Google Chrome, Firefox, or Safari will work. In the address bar, type connect.cfibilling.com and press Enter.
The sign-in page will load at https://connect.cfibilling.com/RDWeb/webclient/.
 Enter your login credentials:
- Username:
CFIBILLING\XX1— where XX is your two-letter code and your user number. - Password: This is your External password. You should have received an email from the Cornerstone Customer Success team with your login credentials.
- Username:
⚠️ IMPORTANT
If you have not received your credentials, please call 1-847-405-9517 Ext 1 to reach our Customer Success Team.
- Once logged in, you will see one of three Cornerstone servers: Cornerstone 1, Cornerstone 2, or Cornerstone 3. In the top right-hand corner of the browser window, click on the cog or gear icon.

- After clicking the gear/cog icon, select the "Download the rdp file" radio button from the pop-up Settings menu. Then click on the Cornerstone Server icon shown on the main screen of your browser.

Depending on which server you connect to, you will see one of the connections below available for download:
- Once the RDP file is downloaded, go to your Downloads folder. Right-click the Cornerstone RDP file, then copy and paste a copy to your desktop.
Part 2: Set Up Credentials in Windows Credential Manager
Next, we need to set up credentials for Remote Desktop Access to Cornerstone.
- Click into Windows Search and type Windows Credentials Manager or Credential Manager (without quotes).
- Click > Open on the Credential Manager Control Panel result.

- With Credential Manager open, click Windows Credentials.

- Click > Add a Windows credential (highlighted in green).

- Enter your credentialsas follows:
- Internet or network address:
connect.cfibilling.com - Username:
CFIBILLING\XX1(where XX1 is your two-letter code and user number) - Password: Enter the password for your external login. Please be careful when entering the password, since there is no way to show what has been typed.
- Internet or network address:

- Click OK to save your credentials.
Part 3: Configure the Remote Desktop Connection
- Right-click on the Cornerstone RDP icon you copied to your desktop. If you have not done this yet, go to your Downloads folder and copy and paste the Cornerstone RDP connection file you downloaded in Step 4.
- If you are using Windows 11, left-click Show more options from the context menu. If you are using Windows 10 or lower, skip to the next step.
- Right-click the Cornerstone
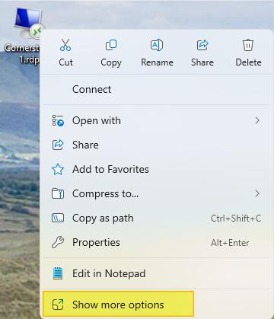
RDP icon. When the right-click context menu opens, click > Show More Options

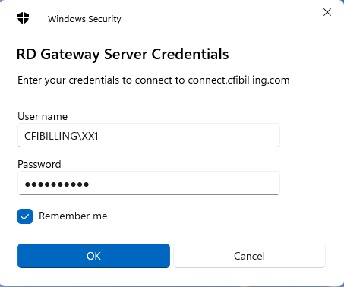
- Check your credentials in the Remote Desktop Connection window. If you set up your credentials in the Credential Manager steps above, you should see your username already entered under USERNAME. If your credentials are not displayed, put a check in "Allow me to save credentials", then click Connect. You will be prompted to enter your credentials again:
- User Name:
CFIBILLING\XX1 - Password: Your External Password
- User Name:
- Then put a check in "Remember me" and click OK.

- Click > Connect on the Remote Desktop Connection window to connect to Cornerstone.
Advanced Settings
Display Settings
To change the display settings of your connection:
- Right-click the Cornerstone RDP iconon your desktop.
- Windows 11: Click Show More Options, then when the context menu opens, left-click Edit.
- Windows 10 or earlier: Right-click the Cornerstone RDP icon, then left-click Edit.
- When the Remote Desktop Connection window opens, click the Display tab.
- Use the slider to change the size of the remote desktop window.
- To switch between Cornerstone and your own desktop, uncheck the box next to "Use all my monitors for the remote session".
- To save changes, click the General tab, then click Save.

Drive Mapping
Linking a local drive to your RDP connection allows you to upload files from your client PC directly to Cornerstone's desktop application. This is a useful way to upload documents to a customer account or service ticket.
Connecting a Mapped Drive to Your Cornerstone RDP Connection
- Right-click the Cornerstone RDP icon on your desktop. If you have not done this yet, go to your Downloads folder and copy and paste the Cornerstone RDP connection you downloaded as shown in Step 4.
- Open the Edit menu:
- Windows 11: Click Show More Options, then left-click Edit.
- Windows 10 or earlier: Right-click the Cornerstone RDP icon, then left-click Edit.
- With the Remote Desktop Connection window open, click the Local Resources tab, then click More...

Document Methods: FTP vs. Mapping
FTP (File Transfer Protocol) — Best for dealers using the Cornerstone Mobile Connect App
If your technicians need access to customer documents while using the Cornerstone Mobile Connect App, you will want your database to be set up as an FTP connection. Call the Cornerstone Customer Success Team at 847-405-9517 to get set up for FTP.
⚠️ IMPORTANT
Please note there is a monthly fee to store documents on Cornerstone's servers.
When set for FTP, files are uploaded to and stored on Cornerstone's servers. Documents stored on Cornerstone's servers are stamped with the Customer Account number.
Example: 3M Floor Plan - Building G.pdf becomes PYP1653-3M Floor Plan - Building G.pdf
The document is stamped with the customer account number. If you update the document, you will need to upload a new copy to replace the existing document.
Uploading a Document to a Customer Account (FTP)
- Open the customer file maintenance page, then click Documents.
- Click > Insert.
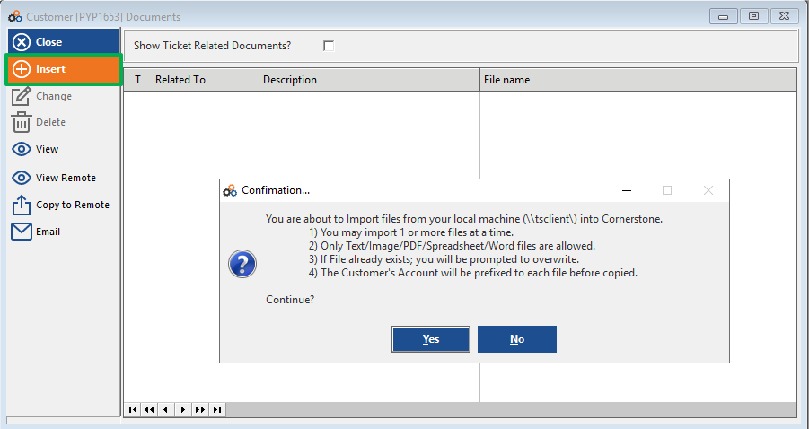
- Click Yes to the Confirmation prompt. Please note only Text, Images, PDF, Spreadsheet, and Word files can be uploaded.
⚠️ IMPORTANT
Only Text, image, and PDF files can be opened in Cornerstone's desktop application. You can download Excel or Word documents to your local machine to view them.
- If you have mapped your local drive, you should see the drive listed in the File Explorer window. In the example shown, this is \\tsclient\C. If you have mapped additional drives, you will see them listed. Double-click \\tsclient\C, then navigate to the folder where your document is stored.

- Click on the file name, then click Open.

- Then click > OK on the file upload confirmation. The document has now been uploaded to the customer document area and the customer account number is appended to the beginning of the file name.


Viewing an Uploaded Document
To view the document, highlight the record, then click View.
To view a document without uploading the file, click View Remote. Then navigate to \\tsclient\c, then navigate to the folder containing the file. Highlight the file and click Open. The document will open in the Cornerstone application document viewer.

Downloading a Document from Cornerstone's Servers (Copy to Remote)
- If you need to download a copy of a document stored on Cornerstone's servers, tag the file by putting a check in the checkbox, then click Copy to Remote.

- Click > Yes to copy the file to your local machine.
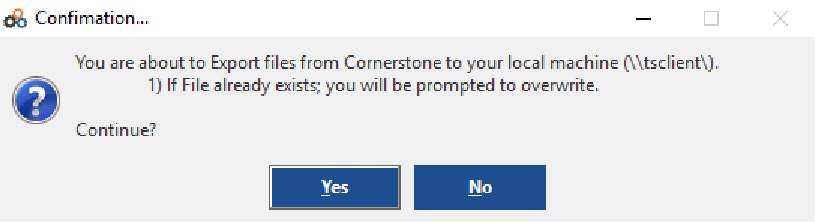
- Browse to the folder you want to copy the file to, then click OK.

Mapping — Best for Dealers Not Using the Cornerstone Mobile Connect App
Linking documents using the Mapping method has advantages over FTP. The documents are stored on your local machine and linked to Cornerstone's desktop application. If you make changes to or update the documents, opening the document in Cornerstone will always bring up the latest version.
⚠️ IMPORTANT
You will need to have mapped a drive through the Remote Desktop connection before you are able to upload documents from your local client machine. Refer to the Drive Mapping section of this guide for instructions.
Linking a Document to a Customer Account (Mapping Method)
- Open the customer file maintenance page, then click Documents.
- Click > Insert.

- Click the upload file icon (highlighted in yellow) in the Document entry window.

- From the left panel, navigate to Network, then tsclient. Depending on which drives you have mapped to your remote desktop connection, select the appropriate drive. In the example, click \\tsclient\C.
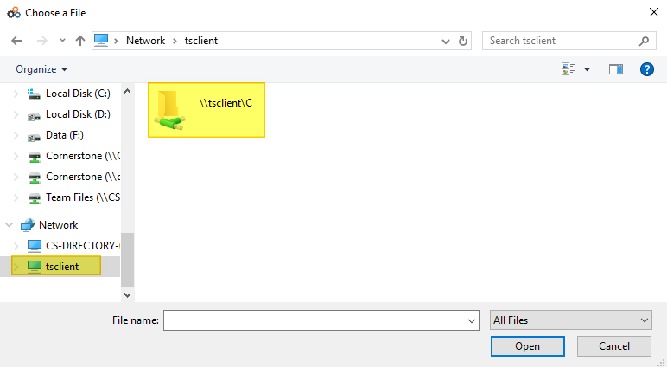
- Navigate to the folder and file you would like to link to your customer account. Highlight the file, then click Open.

- A confirmation dialog box will open. Click OK if the current selected file is the correct one.

- Once you click OK, the document will be linked to your customer's document list.

Need Additional Help?
Our Customer Success team is here to assist you.
Phone: 847-405-9517 x1
Email: customer.success@alarmbills.com
Copyright © 1999–2026 Cornerstone Billing Solutions. All rights reserved.
Was this article helpful?
That’s Great!
Thank you for your feedback
Sorry! We couldn't be helpful
Thank you for your feedback
Feedback sent
We appreciate your effort and will try to fix the article