Overview
This guide provides Cornerstone's accounting suggestions for booking receipts, tracking billings and receipts by category using General Ledger (GL) Codes, assigning Invoice Categories, running month-end reports, handling prepaid credits, and tying out cash receipts. Always check with your accountant when implementing these recommendations.
Booking Receipts for QuickBooks
Receipts deposited through Cornerstone will be logged in the Support Log "RECEIPTS" note for payments made during the month. Month end deposits are not recorded.
It is suggested that daily local deposits be logged by staff to the 2nd Cornerstone log note, "Local RECEIPT" — this way, you can review this note at your leisure, and enter into QuickBooks the daily deposit amount.
It is recommended that you book ALL deposits initially to an account such as "Recurring Sales" — then at month end, a simple journal entry can move amounts into other categories for Installation, Service, etc. (see Month-End Receipts Allocation section below).
Tracking Billings and Receipts by Categories
Billings are tracked through the use of the General Ledger (GL) Codes. This can be done with great detail — for example, a single invoice containing a line for parts, a line for labor, a line for installation, and a line for the first month of recurring can capture the amounts invoiced by those categories IF YOU ASSIGN EACH CHARGE ITS RESPECTIVE GL CODE.
The Invoice Category assigned to an invoice that is posted as paid is what tracks receipts by category. The payment gets applied to an invoice total — not to individual items. As such, you can look at receipts by the invoice category that is assigned. All recurring invoices are assigned the category of the first recurring charge. Product invoices must be assigned an invoice category by you.
General Ledger (GL) Codes Table — the GL Table is key if you wish to track your billings. The billings can be tracked at a granular level of detail as every invoice line item that you enter on an invoice can have a GL Code assigned to it. Navigate to File > Setup Wizard, which has different tabs for the fields that you need to use. You can enter GL Codes that you wish to use; there is also a tab for recurring charges and invoice categories.
The Setup Wizard screen showing tabs for Tax Table, Employee Profiles, Invoice Categories, Recurring Charges, Introduction, Company Header, Security, GL Table, Defaults, and User-Defined.
Chart of Accounts — Sample GL Code Setup
Below is a sample from a dealer who is trying to track as few "Buckets" as possible while preserving a level of detail that is meaningful. The Chart of Accounts Table shows GL Codes such as ACCESS CONTROL, CEL, DIS, EQUIPMENT, FIRE, FIRE/VIDEO/ACCE, INSTALL, and INTRUSION — all assigned as Accounts Receivable account types.
The Chart of Accounts Table showing sample GL Codes (ACCESS CONTROL, CEL, DIS, EQUIPMENT, FIRE, INSTALL, INTRUSION) with their Account Types and Descriptions.
Assigning GL Codes
You can build a Master Inventory list to streamline the creation of Quotes, service tickets and related invoices. You can include detail on prices and cost so that you can track profitability and even parts on hand. Each "Part" entered should have a GL Code assigned to it so you can track the billings. You need to decide what you want to track — for example, Installs / Service / Labor / Parts or buckets of greater detail.
The Inventory Master List showing Part IDs, Descriptions, Unit Cost, Price, Tech Payout, and GL Code columns — with all sample parts assigned the GL Code "PARTS".
Step 1: Assign a GL Code to a Part
Click on the General Ledger Code field to assign the GL Code to a Part. The General Ledger Account dialog allows you to set the GL Code, Account Type, Description, Subaccount Of, Ok For Parts?, QuickBooks Options (Omit?, GL Code, Class), and Inactive status.

The General Ledger Account dialog with fields for GL Code, Account Type, Description, Subaccount Of, Ok For Parts?, and QuickBooks Options including Omit?, GL Code, and Class.
Step 2: Assign a GL Code to Product Invoice Line Items
If you create a P invoice and use the add text line or the Insert button to select a part, be sure that you have a GL Code assigned to that charge that you entered so the amounts get captured in the GL Reports. The GL Code field is visible on the Product Invoice Detail Item screen.

The Product Invoice Detail Item screen showing the GL Code field with an arrow indicating where to enter the code, along with fields for Part ID, Inventory Location, Part Description, Quantity Sold, Unit Price, Discount Rate %, Extended Price, and Taxable status.
⚠️ Important: Cornerstone assigns a GL Code to the recurring charges when we get you set up in the system. If you add additional recurring charge codes, you must assign the GL Code yourself.
Assigning Invoice Category
Product Invoices — As staff generates Product invoices in Cornerstone daily, in addition to having a GL Code assigned to each charge, it is important to assign an INVOICE CATEGORY to each new invoice so that the company can properly categorize revenue at each month-end. Be sure to click on the BOX to the right of "Category," then "Select" one item on the list — don't type in manually. Ideally, you should minimize the number of Categories to choose from so that it is done with the correct categories.
Common invoice categories include: BALFWD — balances brought forward from a system used before Cornerstone (this Category can be changed as payments are made / posted to these older invoices); INSTALL, SVC CALL, RECONNEC — self explanatory.
The invoice header area showing the Category field with an arrow labeled "Assign an Invoice Category to the Invoice," alongside SalesRep, P.O. Number, Ticket#, and Revised Inv Date fields.

The Invoice Category List showing categories such as AWR (Alarm Central Wireless), BALFWD (Balance Forward), CEL, DEALER, DIS, INSTALL, MAI, MOA, and MON, with options to Close, Insert, Change, and Select.
Recurring Invoices and Category Assignment
Recurring Invoices — When Cornerstone runs the recurring batch each month, or if you use the Insert Recurring invoice using the Automatic mode (it looks to the recurring charges), the "Category" box is automatically populated with the Recurring Charge Code for the account's first recurring charge. If you use a P invoice as the 1st recurring invoice (not recommended), choose the recurring code as the Invoice Category.
The Recurring Charge codes DO NOT need to be entered in the "Category" drop down list; they will appear on Cornerstone Reports as a result of the Recurring Billing process which populates the recurring code in the Category box.
⚠️ Important: Automatic Recurring invoices will assign a Category using the 1st Recurring Charge. YOU MUST ASSIGN the Category if you create a Manual recurring invoice.
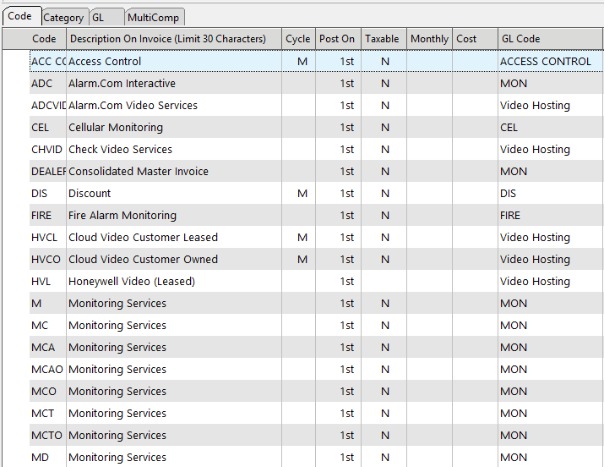
A sample Recurring Charges Code List showing codes such as ACC CC (Access Control), ADC (Alarm.Com Interactive), CEL (Cellular Monitoring), FIRE (Fire Alarm Monitoring), M/MC/MCA (Monitoring Services), and their associated GL Codes.

A sample Recurring Invoice (Chg) screen showing the Category field automatically populated with "MON" — the first recurring charge code — along with invoice details including Post Date, Invoice Date, Number, Due Date, and a line item for Alarm Monitoring.
Month-End Billing Totals — Billing Detail Report
The Billing Detail Report allows you to look at the Billings for the time period specified broken out by the GL Codes. You can look at the report by summary or with detailed invoice information.
The Billing Detail report provides four sections:
Section 1: Invoice by invoice detail of the invoiced amount in the period with line item detail for the GL Codes in the invoices. The amounts are shown for Product and Recurring invoices. Receipts against those invoices are displayed in this section.
Section 2: Summary of the Invoiced / billed amounts by GL Code. If there is a *Missing section, that tells you that some item has been added but was not assigned a GL Code. You can find it in the detail section and edit.
Section 3: Provides a summary of the Cash Receipts during the specified period identified by who posted the payments — Cornerstone or the Dealer (identified with *). Receipts that do not have an invoice to post against are recorded as PREPAID credits that can then be applied against new invoices.
Section 4: Provides the Cash Receipts allocated across the line item detail of the paid invoices to provide payment allocation by GL Code.

The Billing Detail report setup dialog showing fields for Date Min, Date Max, Limit to Account, Limit to Master, Limit to Category, Summary Only checkbox, Export Quickbooks Files, Trace Allocations, Which Section, Journal Date, and Journal Number, with Preview, Email Setup, Print, and Cancel buttons.

Billing Detail Report Section 3 — GL Accounts: Payments — showing a summary of cash receipts by GL Code for 02/01/2020 to 02/29/2020, including Expense (WRITEOFF), Income (*Dealer Posting and CFI Posting), and Other Current Liability (*PREPAID Prepaid Credits) with posting receipt totals.

Billing Detail Report Section 4 — GL Accounts: Payments Allocation — showing cash receipts allocated by GL Code (EQUIPMENT, LABOR, MON, SERVICE, TEST, TOTAL CONNECT) across *Dealer Posting and CFI Posting columns for 02/01/2020 to 02/29/2020.
Month-End Receipts Allocation — Cash Receipts Report
At each month end, a simple journal entry can allocate receipts to the main income categories. Detailed GL Code information on receipts can be pulled from the Billing Detail Report. If all you need is the receipts by the invoice category, you can run the Cash Receipts Report with the following settings: select the Date Range (first and last days of month), YES to Print Prepaid Credits, YES to Subtotal by Category, and Summary for Style.
The Summary choice will generate a summary cash receipts report for the month, subtotaled by Category.
If Product Invoices have been generated that were NOT assigned a Category (INSTALL, SVC CALL, etc.), the total of these invoices will be in a "Blank" Category and will be the first line. To find these specific invoices, re-run the report and select "Detail" instead of Summary. Then go to the accounts and open the invoices and select a Category. When that's done, rerun the report; the allocation will be more accurate.

The Cash Receipts Report setup dialog showing Checks Posted From/Until date fields, Print Prepaid Credits set to YES, Select Sort/Break Field set to Category, SubTotal by Break set to YES with Style set to Summary (highlighted in red), along with Postings By and Select Report Filter set to All.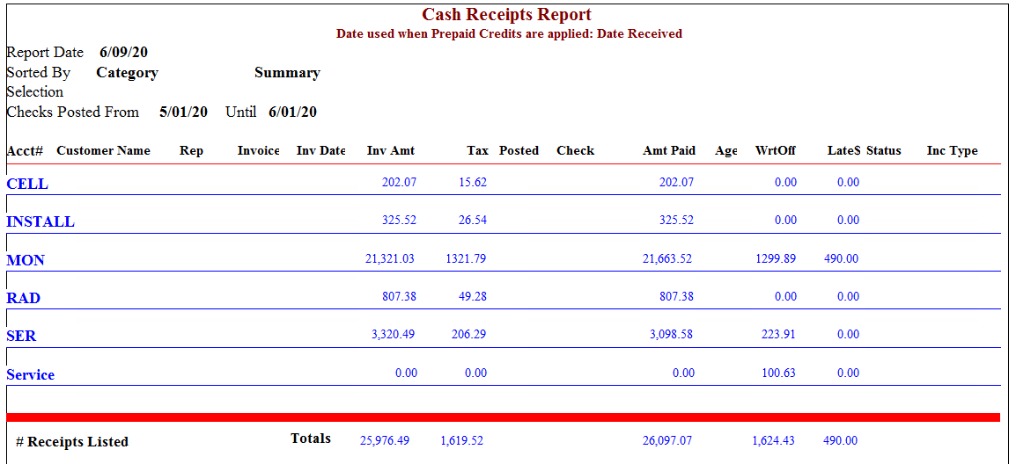
A sample Cash Receipts Report sorted by Category in Summary view for checks posted 5/01/20 to 6/01/20, showing categories CELL, INSTALL, MON, RAD, SER, and Service with invoice amounts, tax, and amounts paid subtotaled by category.
Most of the Categories above relate to Recurring Invoices / Codes. To allocate INSTALL and INSP cash receipts in QuickBooks, go to menu item Company, then Make General Journal Entries. The Account for the debit entry should be the Recurring Sales (or similar) account you have been booking the deposits to all month. The debit would be INSTALL receipts and INSP receipts. The two balancing credits would then be these two amounts to the relevant QuickBooks sales accounts, such as Installation Sales and Inspection Sales. This simple entry moves receipts into the proper categories, for a more accurate Income Statement.
Prepaid Credits
The last page of the Cash Receipts Report will show the amount of open / unapplied credits created during the month. (This also shows on the Billing Detail Report.) These are dollars received, but not yet applied to invoices (and so probably not earned). Some of these credits probably came through Cornerstone (those that start with CFI Pmt $ and are assigned PREPAID), and some through the company's local receipts processing / posting (*PREPAID).
Your accountant will need to help you decide how to handle this — take these receipts into income, or put them on the balance sheet as a liability until those credits are applied. To check each month how much has been applied in Cornerstone, after month-end run the Credit Report for the 1st through last day of the month, and check "Total Credits Applied" on the last page. If you move the "Unapplied Deposit Totals" to your balance sheet, the Journal Entry is: Debit – Recurring Sales (since you put all deposits into this account), Credit – Customer Prepayments (or similar, a current liability account). To reverse these entries as credits are applied, run the Credit Report, and Debit – Customer Prepayments, with the matching Credit – Recurring Sales (could be Install Sales, or a general Sales From Prepayments revenue item, since it may not be easy to see when / where all the prepayments were applied).
When the unapplied deposit / prepaid credit is applied to an invoice, it will use the date that the credit was created as the posting date and be assigned PREPAID as the Income Type.
⚠️ Important: YOU SHOULD REVIEW THE CREDIT REPORT MONTHLY TO REVIEW AND VERIFY CREDITS CREATED BY YOUR OFFICE. You also want to see if credits can materially affect your Sales Tax Payments.

The Credit Report By Number header showing report date 6/09/20, selection criteria (Credits: ALL AND Filter: All AND Accounts: All), received from 5/01/20 to 6/01/20, with column headers for Credit, Date Received, Acct #, Account Name, Type, Category, Apply After, Original Amount, Current Balance, and Credit Description.

The Credit Report summary totals showing Total Credits Listed: 32, Total Credits Posted: 3,107.29, Total Credits Open: 394.99, Total Credits Applied: 2,712.30, Applied to Prior Period Invoices: 1,824.70, Applied to Current Period Invoices: 325.54, and Applied to Future Period Invoices: 562.06.
Tying Out Cash Receipts
Ideally, company receipts plus Cornerstone receipts (from the receipts log notes, plus the final "stub period" amount on the Cornerstone month-end recaps) should equal Cornerstone's Cash Receipts for the month, including Unapplied Credits created during the month. If they don't, it's usually because there were manual adjustments (or data entry errors) that changed invoice / payment dates, removed / moved amounts posted, deleted invoices or payments, etc.
It is important that dates / posting amounts for prior months are NOT changed, so receipts discrepancies are kept to a minimum. Cornerstone provides the line item details for the receipts it has processed during the month in the "CFN Cash Receipts Report" that is used for the Recap (a hard copy is mailed after month-end). The Primer also goes through a sample reconciliation. Below are sample reconciliation worksheets set up as Excel sheets.

Sample month-end reconciliation spreadsheet (Sample Security June) showing Beginning AR, Future Autopay Postings, Beginning Receivables, Plus Billings, Cash Receipts breakdowns (Less Cash Receipts — Cornerstone, Less Company receipts posted as CHK/CARD & *PREPAID, Less Company receipts posted as PREPAID credits), Other Changes to A/R, Calculated Ending AR, Month End Adjusted Receivables, and Actual vs Calculated Ending AR Difference with explanatory column C notes.
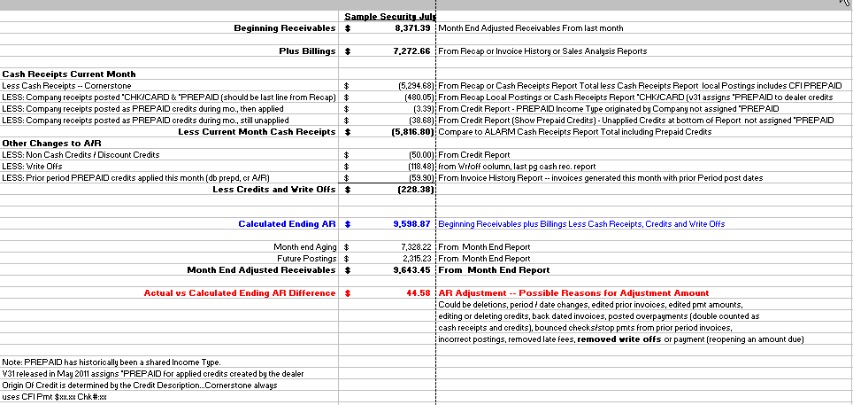
Second sample month-end reconciliation spreadsheet (Sample Security July) continuing from the June sheet, showing the same reconciliation structure with Beginning Receivables carried forward from last month's adjusted figure, with notes on PREPAID income type, V3 release date, and CFI Pmt origin of credit.
Tracking Changes in Receivables
The Adjustments Tracking Report can assist you in identifying changes to invoices and payments.
Need Help?
Our Customer Success team is here to assist you.
Email: customer.success@alarmbills.com
Phone: 847-405-9517 x1
Copyright © 1999–2026 Cornerstone Billing Solutions. All rights reserved.
Was this article helpful?
That’s Great!
Thank you for your feedback
Sorry! We couldn't be helpful
Thank you for your feedback
Feedback sent
We appreciate your effort and will try to fix the article