This article explains how to change the Post On date for autopay invoices — both for future invoices before they are processed, and for invoices that have already been posted as paid but have not yet been processed.
For Future Invoices
Follow these steps to update the Post On date before an invoice is processed:
- Open Recurring Charges. From the customer account, click Recurring Charges.

- Select the charge. Highlight the charge that is set to autopay and click > Change.

- Review the current date. Check the date shown in the Post On field.
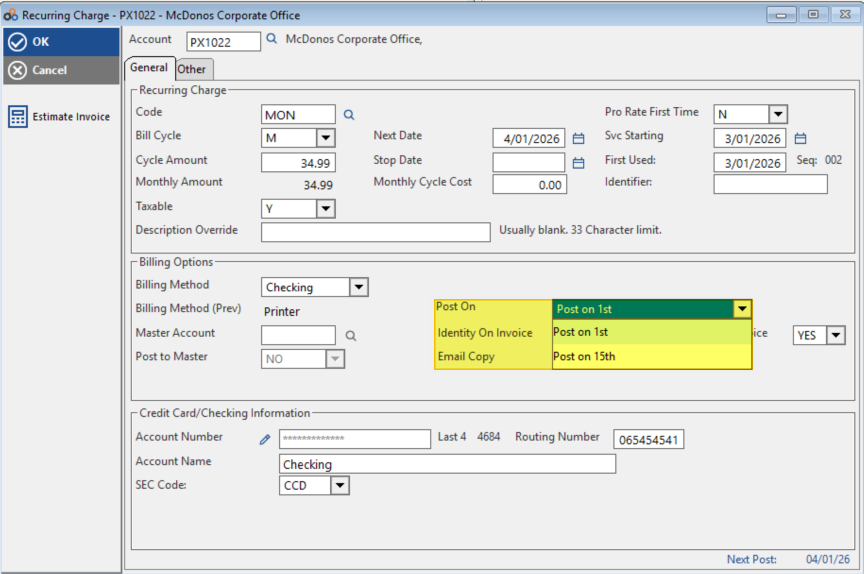
- Select a new date. Choose the appropriate new date from the field.
- Save the change. Click OK to save.
For Current Invoices (Posted as Paid, but Not Yet Processed)
If an invoice has already been posted as paid but has not yet been processed, follow the steps below. You will first update the Post On date, then remove the existing payment posting and re-queue the invoice for autopay with the new date.
⚠️ IMPORTANT
You must complete Step 1 (updating the Post On date via Recurring Charges) before proceeding with the remaining steps below. Skipping this step will result in the invoice being re-queued with the original date.
- Update the Post On date first. Follow all steps in the For Future Invoices section above to change the Post On date in Recurring Charges.

- Open Invoice History. From the customer account, click Invoice History.
- Select the invoice. Highlight the invoice with the future paid posting.
- Open Payments. Click Payments.
- Delete the payment amount. Highlight the $ amount and press the Delete key.

- Clear all fields. Click YES to clear all fields.


- Confirm. Click OK.
- Acknowledge the balance. Click OK again to confirm the customer still owes the amount.

- Re-select the invoice. Highlight the invoice.
- Queue for autopay. Click the AUTOPAY icon.
- Confirm the new date. Click OK to slide the invoice into the autopay file with the new date.
Need Additional Help?
Our Customer Success team is here to assist you.
Phone: 847-405-9517 x1
Email: customer.success@alarmbills.com
Copyright © 1999–2026 Cornerstone Billing Solutions. All rights reserved.
Was this article helpful?
That’s Great!
Thank you for your feedback
Sorry! We couldn't be helpful
Thank you for your feedback
Feedback sent
We appreciate your effort and will try to fix the article